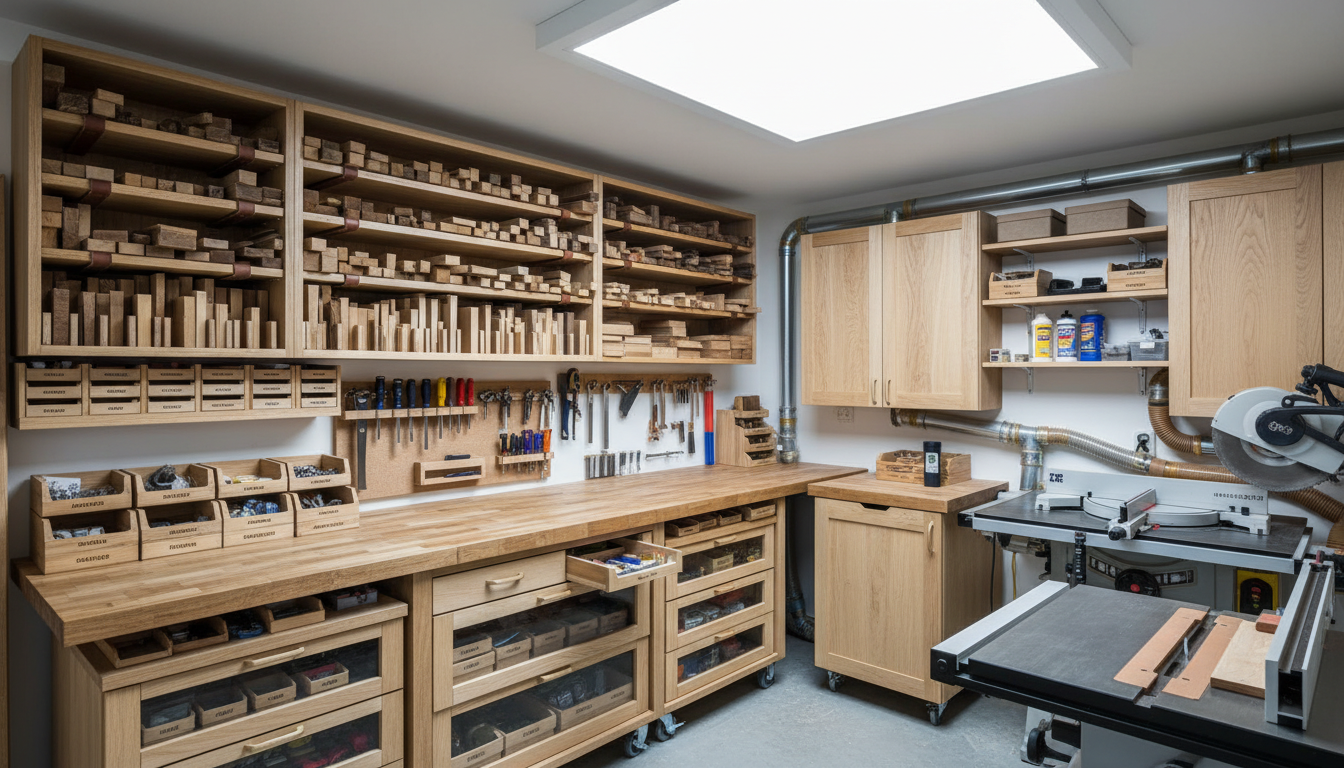
Every woodworker knows the frustration. Scrap wood piles up in corners. Tools disappear under leftover plywood pieces. Your small workshop becomes a maze of boards and offcuts.
This Website contains affiliate links. That means I may earn a small commission if you purchase through my links, at no extra cost to you.
The solution sits right in front of you. Those same wood scraps cluttering your space can become your best storage solution.
Why Scrap Wood Storage Ideas Work Better Than Store Solutions
Store-bought organizers rarely fit your exact space. They cost money you could spend on better tools. Worst of all, they ignore the unique sizes and types of wood you actually use.
Your leftover lumber tells a different story. Each piece represents a past project. Each scrap reflects your actual work patterns. When you build storage from these materials, you create systems that match your real needs.
Perfect Size Match
Custom storage fits your workshop dimensions exactly. No wasted inches. No awkward gaps.
Measure your actual wall space
Use every vertical inch available
Create storage that fits your corner areas
Build organizers for your exact wood sizes
Zero Material Cost
Your scrap pile becomes free building material. Every storage project uses wood you already own.
Transform offcuts into functional shelves
Repurpose plywood scraps for dividers
Use small pieces for organizer parts
Save money while reducing waste
Building your own wood storage organizer takes less time than shopping for the right product. You skip the store trip. You avoid assembly instructions written in three languages. You start with materials already sitting in your workshop.
Three Essential Small Space Storage DIY Wood Projects
Wall-Mounted Vertical Rack System
Vertical storage multiplies your workshop capacity. Walls offer your largest unused surface. A simple rack system keeps long boards accessible while clearing floor space.
Start with two vertical base pieces attached to wall studs. Add horizontal supports every twelve inches. Space them to hold your most common board widths. Use scrap two-by-fours for the frame. Plywood scraps work perfectly for shelf pieces.
Quick Tip: Angle your shelves slightly downward at the back. This prevents boards from sliding off while keeping them easy to grab.
Rolling Scrap Wood Cart
Small pieces need their own home. A mobile cart brings storage where you need it. Build compartments sized for your actual scrap dimensions.
Create a base frame from leftover lumber. Divide the interior into sections using plywood dividers. Add casters to the bottom for easy movement. Include a top shelf for frequently used pieces.
Sort scraps by size in different compartments
Keep the cart near your workbench for easy access
Use clear sections to see pieces quickly
Label each section for specific wood types
Overhead Lumber Storage
Garage ceilings waste valuable space in most workshops. Overhead racks solve two problems at once. They store long lumber safely while keeping it completely out of your way.
Mount sturdy brackets to ceiling joists. Span them with crosspieces that cradle your lumber. Keep the height accessible with a step stool. This setup works especially well for plywood sheets and long boards you use less frequently.
Ready to Build Professional Storage Systems?
These basic projects work great for getting started. But detailed plans with exact measurements, cutting lists, and step-by-step instructions can save you hours of figuring things out. Get access to complete blueprints designed specifically for small workshops.
Random storage creates constant searching. Organized storage saves time on every project. Sort your wood pieces by both size and type for maximum efficiency.
Standard Size Categories
Long pieces over 24 inches
Medium pieces 12 to 24 inches
Short pieces 6 to 12 inches
Small scraps under 6 inches
Sheet goods and plywood
Specialty woods separate from common lumber
Label each section clearly. Use different areas for different wood types. Keep hardwoods separate from softwoods. Store treated lumber away from indoor project materials.
Review your storage every few months. Discard pieces too small for practical use. Consolidate partial boards when possible. Keep your system current with your actual needs.
Corner Space Solutions
Workshop corners typically gather dust and random items. Converting these areas into active storage adds surprising capacity. Corner designs maximize awkward spaces that regular shelves waste.
Build triangular shelf units that fit snugly into corners. Angle the shelves outward for easy access. Use the vertical height completely. These spaces work perfectly for storing longer boards vertically or holding bins of small offcuts.
Mobile Workbench With Integrated Storage
Your workbench offers more than just a work surface. The space beneath holds enormous storage potential. Adding organized compartments keeps tools and materials exactly where you need them.
Create pullout bins under your workbench for scrap wood. Install small shelves for frequently used tools. Add a vertical slot on one end for sheet goods. Keep everything within arm’s reach of your main work area.
Measure the space under your existing workbench
Design storage that fits your most-used items
Build with leftover plywood and scrap lumber
Install drawer slides for easy access bins
Add dividers to keep different sizes separate
Advanced Storage Ideas That Maximize Every Inch
Sliding Panel System for Sheet Goods
Plywood and large panels challenge every small workshop. Stacking them horizontally wastes floor space. Leaning them against walls creates hazards. A sliding panel system solves both problems elegantly.
Install vertical dividers spaced four to six inches apart. Mount them on a frame that allows the whole unit to slide along a wall track. This design gives you easy access to any sheet while using minimal floor space.
Modular Bin System
Fixed storage limits your flexibility. Modular bins adapt as your needs change. Build uniform boxes that stack, hang, or slide into different configurations.
Cut bins to standard sizes that fit your shelving. Make them shallow enough to see contents easily. Add handle cutouts for portability. Stack them or hang them on wall-mounted rails depending on your current project needs.
Small Parts Bins
Perfect for offcuts under six inches. Use shallow depth for visibility.
Height: 4 inches
Width: 12 inches
Depth: 6 inches
Medium Stock Bins
Ideal for 12 to 18 inch pieces. Slightly deeper for capacity.
Height: 6 inches
Width: 12 inches
Depth: 8 inches
Pegboard Integration Strategy
Pegboard offers flexible tool storage that adapts instantly. Combining it with wood storage creates a complete organization system. Mount pegboard sections between your storage shelves for maximum utility.
Use pegboard for tools you grab frequently. Position it at eye level near your workbench. Install wood storage above and below the pegboard area. This creates zones for different tasks while keeping everything visible and accessible.
Transform Your Workshop With Proven Plans
You’ve seen what’s possible with smart DIY storage. Now imagine having detailed blueprints for every project, complete with material lists and cutting diagrams. Professional woodworkers use these exact systems to maximize their small workshops. Get instant access to the same plans they rely on.
Poor measurements ruin otherwise good designs. Take time to measure carefully before cutting any wood. Account for obstacles like electrical outlets, doors, and windows.
Measure wall heights at multiple points for accuracy
Note locations of studs for secure mounting
Account for baseboards and ceiling angles
Leave clearance space for doors and drawers
Mark outlet locations on your plans
Consider future equipment additions
Selecting the Right Scrap Wood
Not all scrap wood works equally well for storage projects. Choose pieces based on their intended use. Structural parts need stronger wood than simple dividers.
Wood Selection Guide: Use solid lumber like pine or oak for load-bearing parts. Plywood works great for shelves and dividers. Save softer woods for non-structural elements like bins and labels.
Fastening Methods That Last
Your storage system needs to handle weight safely. Choose appropriate screws and mounting hardware. Invest in quality fasteners for parts that support heavy lumber.
Wall Mounting Best Practices
Always anchor heavy storage to wall studs. Use lag screws for maximum holding power. Consider adding angle brackets for extra support on loaded shelves.
Finishing and Maintenance
Raw wood storage works fine in most workshops. But adding simple finish extends life and makes cleaning easier. Consider your workshop environment when deciding on finishes.
Sand rough edges to prevent splinters. Apply a coat of polyurethane to pieces that might get wet. Leave most surfaces natural to save time and money. Focus finishing efforts on frequently touched parts like handles and drawer fronts.
Avoid These Common Wood Storage Mistakes
Overbuilding Your Projects
Many woodworkers build storage stronger than necessary. This wastes good scrap wood and takes extra time. Design for the actual weight your storage will hold.
A shelf holding hand tools needs less support than one holding power tools. Small scrap bins require lighter construction than lumber racks. Match your building materials to the expected load.
Ignoring Access Patterns
Beautiful storage fails if you can’t reach what you need. Plan storage locations based on how often you use items. Keep frequently needed pieces at easy access height.
Store daily-use items between waist and shoulder height
Place heavy pieces low for safe lifting
Put rarely-used wood in overhead or high storage
Keep project-specific pieces near your main work area
Forgetting Future Needs
Your tool collection grows over time. Your project types evolve. Build storage systems that adapt to changing needs. Leave room for expansion in your initial design.
Add extra shelf positions beyond current requirements. Build modular units that accept additional sections. Use adjustable shelving wherever possible. Plan for the workshop you want, not just the one you have.
Start Building Better Storage Today
Small space storage using DIY wood solutions transforms cluttered workshops into efficient work areas. You already own the materials. You have the basic skills. The only thing stopping you is taking that first step.
Begin with one simple project. Build a basic shelf or sorting bin this weekend. Experience how much difference organized storage makes in your daily work. Then expand your system as time and scrap wood allow.
The satisfaction of working in an organized space rewards you every single day. No more hunting for the right piece of wood. No more wasting time moving piles to reach your workbench. Just smooth, efficient project work.
Get Your Complete Workshop Storage Blueprint
Stop guessing at measurements and designs. Access proven storage plans used by thousands of woodworkers in small workshops. Each blueprint includes detailed diagrams, cutting lists, and step-by-step instructions. Start building professional-quality storage this weekend with plans designed specifically for limited space.
Your workshop deserves better than chaos. Your projects deserve the efficiency of organized materials. Your scrap wood deserves a purpose beyond collecting dust. Make today the day you transform your workspace into the organized shop you’ve always wanted.
Valentine’s Day offers the perfect opportunity to show your special someone just how much they mean to you. Finding that perfect gift that captures your feelings can sometimes feel challenging, but the right romantic Valentine’s gift idea can speak volumes about your love. Whether you’re celebrating your first Valentine’s together or your twentieth, we’ve curated…
Are you tired of the endless cycle of losing weight only to gain it back? You’re not alone. Millions of people struggle with weight loss because they focus on quick fixes instead of building lasting habits. The truth is simple: sustainable weight loss isn’t about extreme diets or punishing exercise routines. It’s about creating healthy…
You sit down with the best intentions. Your textbook is open. Your notes are ready. But within minutes, your mind wanders to your phone, that conversation from earlier, or what you’ll eat for dinner. Sound familiar? You’re not alone. The struggle to stay focused while studying affects millions of students every single day.This Website contains…
Your mouth reveals more about your overall health than you might realize. Every day, millions of people struggle with bleeding gums, tooth decay, and painful dental issues that could have been prevented with one simple change to their routine.This Website contains affiliate links. That means I may earn a small commission if you purchase through…
Brown stains on teeth can destroy your confidence. Whether you avoid smiling in photos or cover your mouth when laughing, tooth discoloration affects millions of people every day.This Website contains affiliate links. That means I may earn a small commission if you purchase through my links, at no extra cost to you. The good news…
Looking ahead to 2026, gift-giving is evolving with exciting new trends that blend technology, sustainability, and personalization in ways we’ve never seen before. Whether you’re an early planner or simply love staying ahead of the curve, this curated collection of trendy gifts for 2026 will help you discover the next wave of must-have items before…